Creating a table of Resources (Appliances)
Workload Modeller assigns appliances based on what incidents they can respond to. For modelling purposes, appliances are classed as:
- Special Request: a request for a vehicle of this class can only be responded to by a vehicle of this class (set in tblVehicleClasses --) OR
- Specialised: this class of vehicle can respond to a specific range of types only (set in tblVehicleIncidentAssociation Set up > Appliances > Incidents) OR
- General Purpose: This class of vehicle can respond to all incident types (set in tblVehicleIncidentAssociation Set up > Appliances > Incidents)
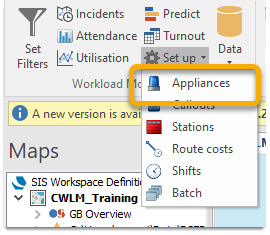
To create and manage tables of Resources, click Setup > Appliances. This opens the Manage Resource (Appliances) Sets dialog.
Click Create to create a new resource.
 Sets dialog.png)
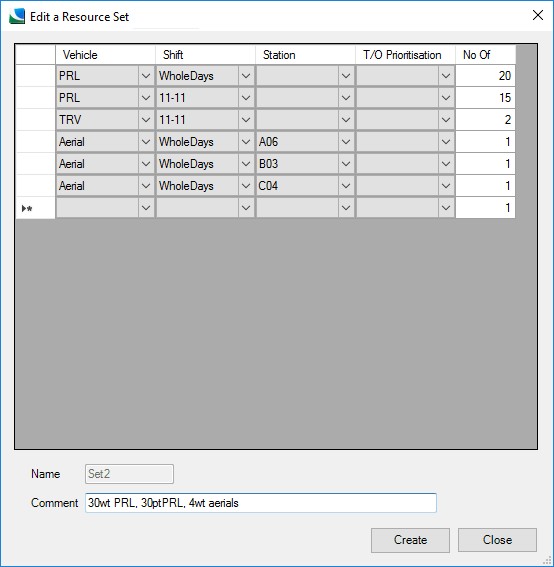
Select options from the drop-down boxes and specify the quantity. The asterisk marks the next new row to be created in the table.
An example of a filled row:
| Criteria | Example value | Participating |
|
Callsign |
2 |
Optional |
|
Vehicle |
PRL |
Mandatory |
|
Shift |
11-11 |
Mandatory |
|
Station |
A06 |
Optional |
|
No. of (quantity) |
1 |
Mandatory |
This displays the resource (e.g. a PRL), with a callsign of 2, the time it is available (e.g. on the 11-11 shift) and and how many of them are defined by this row.
TIP: This is for convenience rather than part of the model; it can be frustrating to create 40 PRL rows individually.
You can also specify where the resource is located – this should be done if there is a small number (relative to the number of stations) of these appliances and their locations are 'predefined' (e.g. there will always be an Aerial at B03.)
Delete
To delete a resource, select the resource and click 
Copy
To copy a resource (normally to form the base shift for editing) select the resource and click 

Enter the As name and any required comment. Click OK.
Edit
To edit a resource set select the shift and click  .
.
This opens the Edit Resources window.
To make changes, follow the steps in Creating a Resource (see above) and click Save.
If you click Close, the dialog will close with no edits being saved.
About Callsigns
In previous versions of Workload Modeller, Resource sets were auto-numbered when created or saved.
For example if you created a resource set of 10 pumps, they were saved in the database as 1, 2, 3 and so on. The numbering was based on the order in which the records appeared in the grid (first row was appliance 1, second row was appliance 2).
This meant when you opened a resource set, sorted the view and then saved it, the appliances were effectively renumbered.
This is not ideal if you want to compare the performance of individual appliances across different models (e.g. two sets of identical appliances could be numbered differently.)
To counter this, Workload Modeller 9 has a few changes In the database:
- VehicleId identifiers in tblRST_ tables are now text rather than autonumbers
- There is a new column Callsign (which maps onto VehicleId in the database)
- If required, you can also hide the Callsign or the T/O Prioritisation columns.
- If you Add Historic appliances, these will be added with their historic callsign (VehicleId)
You do not need to specify callsigns in the dialog. If you leave them blank, Workload Modeller will create a numeric callsign.
Callsigns must be unique in the resource set – if they are not, Workload Modeller will offer to ‘deduplicate’ them for you.
Here is an example of a resource set being constructed.

To delete a row from the set during this creation:
- Select the row by clicking on it (the black triangle to the left shows which row is ‘current’);
- Hit the Delete key on the keyboard.
The values in the drop-down lists for Vehicle, Shift and Station are read from the database – see also Cadcorp SIS Workload Modeller Add-in Database.
To save the resource set, enter a Name, optional Comments and click Create.
- The entry in the Name field must be a single word as this forms part of the table name in the database;
- Resource set tables are saved in the database with the prefix “tblRST_”. So if the resource set was saved as “Set1”, it would be found in the database “tblRST_Set1”.
- Workload Modeller does not provide an interface to edit a resource sets. To do this, edit the set directly on the Workload Modeller database.

Dual Staffing
Defines whether a vehicle class has to be resourced by the crew of another vehicle class.
Click Dual Staffing and select the appropriate staff from the “Staffed by” drop-down menu.

-
The vehicle supplying the crew will be taken off the run until its original crew has been released.
-
The nearest available appliance of one of the relevant dual staffing classes is used.
-
Dual staffing can be applied between classes of special request vehicles.
-
Dual staffing is not enforced; this means even if a special request vehicle is defined as dual staffed, it can still be set up with a ‘normal’ shift. (i.e. Individual appliances can have a different shift than their class)
-
The # Dual Staffing # shift is available 24/7.
Incidents
Staffing Systems for Individual Appliances
The user interface is based on the premise that an appliance’s staffing system is defined by the base at which it is stationed.
The resource set table in the database also has a column for Staffing System. By default this is left NULL meaning the appliance will use the Staffing System of the station at which it is based.
However this value can now be set in the database so an appliance in a resource set can refer to a Staffing system itself.
When this value is set and the appliance is assigned to an appliance request, the Reaction Time used in calculating the duration of that assignment will be derived from the Staffing System referred to by the appliance (rather than the Reaction Time of the Station's Staffing System.)
Controlling Selection Order of Appliances
Resource Set tables are created with a SelectionOrder column – this has NULL values.
Values can be set in the database to influence the order in which appliances are considered during modelling.
For example if the model is looking for a vehicle class of PRL at a station and there is more than one appliance of this type based there, this value will control the order in which they are considered.
Prioritisation
Prioritisation is a named set of incident codes and/or life risk categories with incident numbers and a limit.
The function of Prioritisation is to:
- Allow specific vehicles to be prioritised to certain incidents and limited to maximum response time if required.
- Allow specific vehicle(s) type(s) to be prioritised to specific incidents types but still allow that vehicle type to attend all other incidents.
Resource sets of appliances (used as input to modelling), include a column where a Prioritisation can be specified.
Consider the following example:
- A Prioritisation called ‘Fires 20’ is created which contains an incident code of ‘Fire *’ and a limit of 20.
- You have available a resource set including a Vehicle of type ‘Pump’ on Shift ‘Day Crewed’ at Station ‘Yourtown’. Set its T/O Prioritisation to ‘Fires 20’
- This means for any Fire occurring within 20 minutes travel from 'Yourtown' fire station during the period covered by the ‘Day Crewed’ shift this appliance will be mobilised (if available) even if there are nearer appliances.
Rules on Prioritisation
- Prioritisations do not override Special Requests. If a callout requires a Special Request type of appliance, only an appliance of that type can respond.
- A prioritised appliance can only respond to incidents it is allowed to as defined in the Vehicle – Incident Mapping dialog. (For example if TRVs are set to respond to only small fires they will not respond to a large fire if they are given a Prioritisation to all fires.)
- If multiple Prioritised appliances can respond to a callout, the one with the lowest routecost will be selected.
- If there is a choice of Prioritised appliances from two stations, the one from the ‘quickest to arrive from’ station will be chosen.
- If there is a choice of Prioritised appliances from the same station,the first one considered will be chosen. This can be influenced by setting SelectionOrder in the resource set table.
Using Prioritisation
Click the Prioritisation button to open the Turnout Appliance Prioritisation dialog:
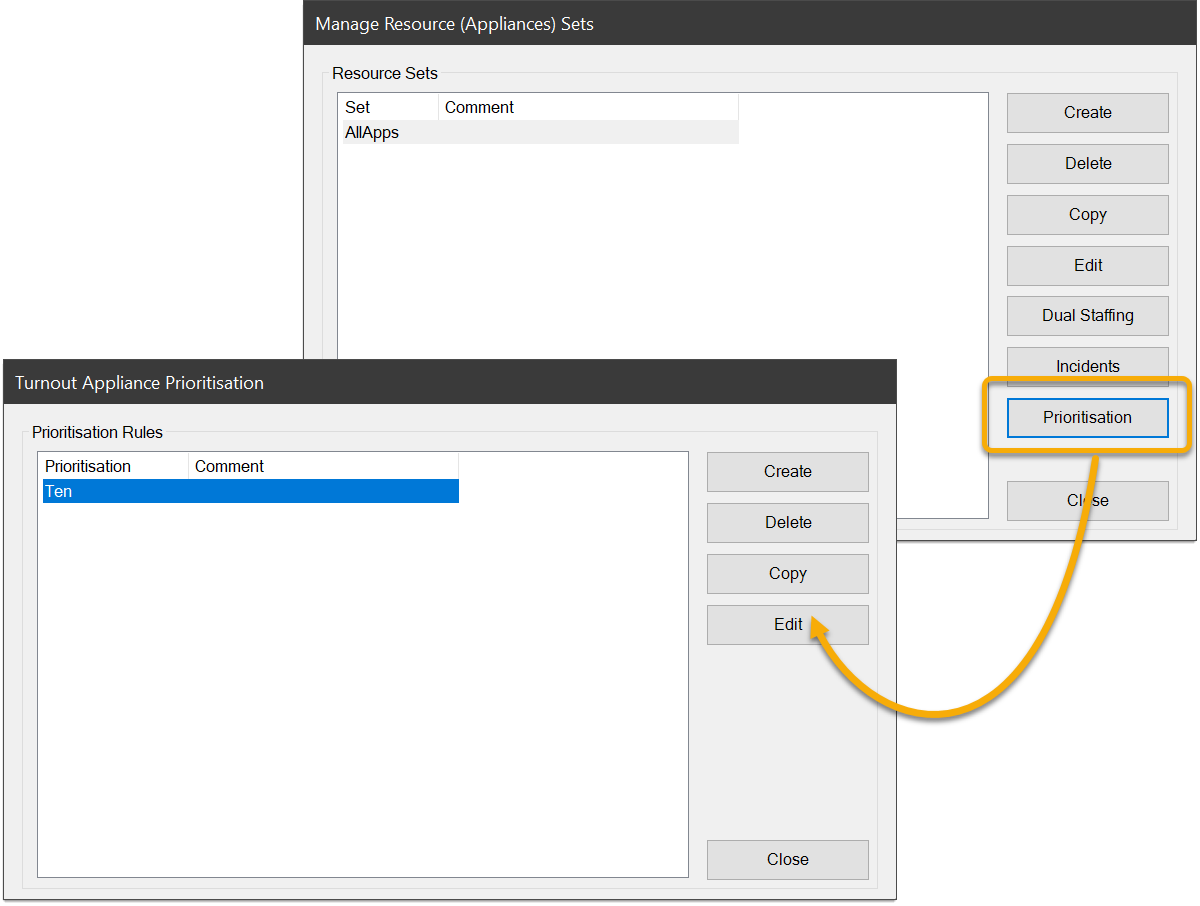
Click Create to create new Prioritisation Criteria or click Edit button to change existing criteria.
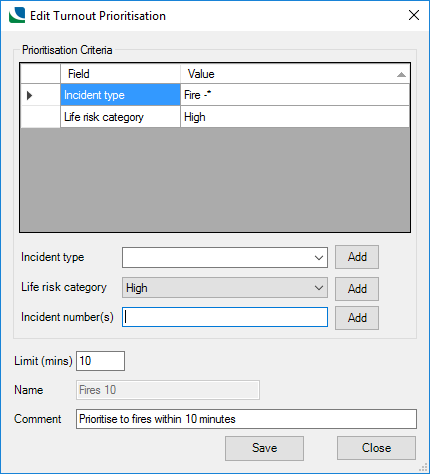
The grid at the top of the screen shows the elements in the Prioritisation. These elements are treated as 'OR' (i.e. an incident has to meet only one criterion to be covered by the Prioritisation.)
- Incident type - these incident types are read from the database. The value can be modified before being added to the grid. This allows wildcard entries to be created. * and % are recognised as wildcard characters.
- Life risk category - these life risk categories are read from the database. The value cannot be modified before being added to the grid. (The underlying assumption is that there will be a relatively large number of incident codes but few life risk categories).
- Incident number(s) - multiple incident numbers can be added in one go – they should be comma or space separated.
- Limit (mins) - this is the travel time limit in minutes - decimals are allowed.
- Enter a Name (if Create rather than Edit has been selected) and any comments if required.
Click Save.
Appliances can be prioritised in the T/O Prioritisation column of the Edit a Resource Set dialog, for example:
